Athletes play sports, yet they also go through extensive drills. Musicians perform at recitals, but first they must spend a lot of time practicing. And it’s the same for artists. The beautiful works artists create are made possible by years of artistic drills, practice sessions, and lots of drawing exercises.
Back in 2015. as a new artist learning to draw, everything I did was really an “exercise” of sorts. The earliest drawing classes I took typically focused on a specific element of art and then incuded projects designed to help improve that particular skill. It was actually many months into my drawing experience before I attempted my first “real” drawing.

.
“The Cat” may not be much to look at now, but for me, at the time, it was a bit of a triumph. For once, I had not followed any tutorial. The reference image came not from any lesson or assignment — other than an assignment I’d given myself to take what I’d learned and put it to use.
It’s fun to look back at my earliest drawings. Each one brings back so many memories! But, again, before we can really begin to draw, we need to spend time practicing, doing drawing exercises that help us improve various techniques.
The most important “technique” in art is observation. Lately this has been quite a challenge for me, but in truth, I’ve always had problems with observation. I recently wrote about the importance of developing our observational skills — Look, Look, Look — and today let’s take it a step further and look, look, look at some practical exercises that can help you become a more observant artist.
Quick Drawing Practices
While many observational exercises emphasize the importnce of slowing down, others take an opposite approach and ask us to draw as fast as we can. How can this help? Simply this — in a limited amount of time, we have to take in as much information as possible as quickly as we can. This trains us to immediately look for the “large elements”. We note the basic shapes and sizes, the angles, and any sense of movement or direction.
Exercise #1 – Gesture Drawing
Gesture drawings are usually “figure” drawings, whereby an artist looks at a subject — real or in reference — and tries to capture the essential elements in a quick burst of speed, perhaps 30 seconds, 45 seconds, or a more leisurely 60 seconds. A great site for gesture drawing practice is Quick Poses, where you can choose various types of poses, and you can actually set the drawing time to as long as 5 minutes.
Don’t limit gesture drawings only to human figures, though. Make “quick sketches” of everyday objects around you, quick “gestural drawings” of animals or try to capture an urban scene or a natural landscape with gestural strokes.
Again, the purpose of the exercise is to train the brain to immediately see the most important elements — the essence — of a drawing subject.
Exercise #2 – The Five Minute Burn
This exercise comes from Bert Dodson’s “Keys to Drawing”, and I’ve written about it before. You grab your phone or a timer, set it for 5 minutes, then pick up your pencil and sketchbook and go! You spend those 5 minutes trying to capture as much visual information as possible about the scene in front of you.
The point here, of course, isn’t to draw accurately, but to challenge your brain to SEE AS MUCH AS YOU CAN. Whereas with a gesture drawing you’re going for only the most basic elements, with a 5-Minute Burn you’re trying to include as much information as you possibly can. Think of it a bit like those “supermarket contests” where a winner has 5 minutes to grab whatever he or she wants and put it in the cart. How much visual information can you cram into your “artistic cart” in 5 minutes?
Memory Exercises
I’m including two memory exercises as part of observational training, because art involves both looking and remembering. So, grab a reference image or set up a simple still life, and try these exercises.
Exercise #3 – Look and Remember
I came across this exercise several years ago during a Sketchbook Revival program. The instructor showed us an image and asked us to look at it — for as long as we felt we needed. We were then told to put the reference image aside — completely aside where we could no longer view it. And, yes, we were expected to draw it, or to at least try to draw it. It was a challenge, for sure. After completing the drawing we were asked to compare it to the reference. I found it interesting to note what I’d included and what I’d completely overlooked!
Helpful information about “memory drawing” is here: A Primer on Drawing From Memory Exercises
Exercise #4 – Close Your Eyes
This exercise is fun! I laughed when it was first suggested. After all, what can we possibly gain from doing this? What I gained was a sense of ease, a feeling of comfort, the ability to relax and fully enjoy the drawing process.
Begin just as with “memory drawing”. Look at an image — human faces are ideal for this exercise — and then close your eyes and just “see” the image in your mind. Of course you can’t draw it realistically, so don’t even think about the results! Just enjoy the pleasant sensation of moving the pencil over the page while holding an image in “your mind’s eye”.
Contour Drawing Exercises
Any time we approach our drawing differently, we activate different “brain muscles” — for lack of a better term. You’re familiar with these techniques, I’m sure, but do you use them often? We’ve all done these various types of “contour” drawings as part of drawing classes. Yet, once we’ve learned how to do them, we probably don’t do them again unless it’s part of another class.
I’m suggesting that we make “contour drawing exercises” a part of our regular art routine, perhaps setting aside a regular time to practice one or more of these methods.
Exercise #5 – Blind Contour Drawing
We all know how important it is to look at what we’re drawing, but we also know that we’ll come up with some strange looking drawings if that’s all we do! Good art, of course, requires that we look at both our subject and our work, and it’s been suggested that we should devote 75% of our efforts to the subject. A blind contour drawing takes that up to 100%. You look at your subject and draw. You’ve done it before, so do it again… and again… and again. It’s really helpful for developing observational skills and for hand-eye coordination.
Exercise #6 – Continuous Line Drawing
In this exercise, unlike a blind contour drawing, you’re allowed to look at both the subject and your paper. The restriction, however, is that you can’t lift your pencil from the page. You find a starting point, and you complete your drawing using one continuous line. It’s another great way of improving observational skills, and it can be quite challenging.
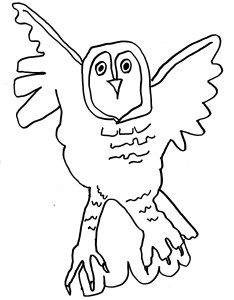
Exercise #7 – Upside-Down Drawing
Too often our “observational” skills get hijacked by our well-meaning brain — which tries to simplify things for us. So, instead of helping us “see” the lines and shapes and angles of a subject, our brain jumps right in and shouts “It’s a bird!” And all observational information is whisked away because, after all, we know what a bird looks like, right? No need to look any further. Turning an image upside down, however, short-circuits our brain.
Here is one “wise old owl” I drew back in 2018 using this drawing exercise:
.
While we often think of “exercise” as a chore, something we don’t really want to do, these drawing exercises are actually a lot of fun — as long as we don’t take ourselves too seriously. These are exercises, remember, not drawings. Even our best efforts will probably be laughable, and that’s how it should be. The purpose here is not to improve our results when doing these exercises, but to practice our observational skills in various ways. By doing that, we will see improvements in our overall drawing abiities.
Do you have other drawing exercises you use and would recommend?
Please share!

Thanks so much for sharing these exercises! I’m definitely going to try some of them.
LikeLiked by 1 person
They’re actually fun!
LikeLiked by 1 person
That’s a great cat drawing 😁
LikeLiked by 1 person
Thanks. I’ve since done better, but I was sure proud of that one when I drew it. I had it hanging on the wall for a long time.
LikeLiked by 1 person
👍
LikeLike