
I had a fun day on Tuesday. Although our Monday night art club meeting was cancelled due to storms moving into the area, our Tuesday afternoon club met on schedule, and we had a great time.
One member showed us how to create small origami boxes, and we were all very pleased with the results.
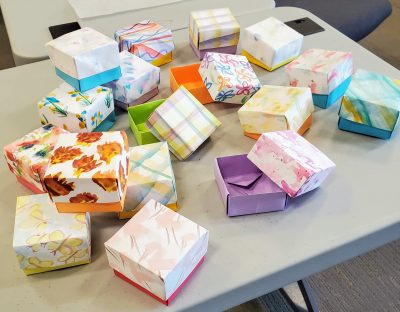
You’ll notice a lot of plaid box tops. In teaching us how to make the boxes, Marcia, our member-instructor, suggested we do one sheet with plaid and one with an all-over design. These boxes, I should point out, were made from regular copy paper. We used watercolor to design the tops. The bottom part was made from colored sheets of copy paper.
Maybe what pleased me the most was that the other members actually liked my boxes, especially the pink and lavender one.

I’m not accustomed to having any of my art pointed out and admired at our meetings, so it was surprising — and delightful. It was, also, another example of my new “do whatever I can” attitude. I did the plaid as instructed, just choosing a couple colors that I thought would work well together, and making stripes across the page. No problem there.
But then came time to do the “all-over” design. Suggestions were butterflies, little flowers, leaves, or anything with a repeating pattern. I started with flowers but I couldn’t keep them uniform. Some were big, some were little and some were nothing more than weird-looking splotches of paint. I’ll mention here that I was using my gansai, of course. What more appropriate way to decorate origami than with Japanese watercolors?
After being disappointed by my attempts at painting little flowers, I decided to just do what I know I do best: have fun with colors in a free-flowing abstract design. I started dabbing on more pink, added a light lavender, and then dropped in a few bits of violet. I even made a few little splatters. Because I chose to “do my own thing”, my box turned out different from everyone else’s, and I suppose that’s why it attracted attention.
Making origami boxes was much more fun than I’d expected. I think everyone at the meeting felt the same. It’s really impossible to make a “bad box” — so give it a try!
Here is an online tutorial that shows the basic steps:
When we made our boxes, we did fold the squares on the diagonal, not straight across as shown in the tutorial, but either way, the results are the same. I’m going to practice using the method shown in this video.
Of course, we made two boxes from two slightly different sizes. The box bottom was made using an 8″ square. The tops were made from an 8-1/2″ square. Here’s a quick look at how to turn an 8-1/2″ x 11″ paper into a square.

To make the smaller box for the bottom, we simply cut a 1/2″ strip from our sheet, turning the 8-1/2″ x 11″ paper into an 8″ x 11″ sheet, then folding it as shown here to create the 8″ square.
One of the most exciting things about our box-making meeting yesterday is that in addition to being fun and practical, this little craft is open to untold possibilities! I can’t wait to make more boxes. I want to use that acrylic gouache that keeps its bright colors; I want to get out those shadow colors of pigmented ink and use them for boxes; I want to grab a Sharpie and make black and white doodles to turn into box-tops.
With Halloween approaching, I want to use black and orange and purple to create spooky boxes, maybe with ghosts and bats or spiders! And then I’ll make Thanksgiving boxes with traditional autumn colors. And wait until Christmas!
I’ll probably color my own sheets for the boxes I make, but imagine little boxes made from old maps, from Christmas wrapping paper, or pages from old magazines! There are so many cute and clever things that can be done to create these “small packages”. I’ll fill them with good things for the grandkids — candy for Halloween, little trinkets for other occasions. The “big kids” — the grown-ups — will probably get a little box with goodies of some sort, too.
Yes, it was a fun day, and I’m looking forward to making many more origami boxes.
Oh, in case you’re looking, here’s a link to “Astrobright” paper — perfect for the bottoms of the boxes. The link goes to Amazon, but I believe I’ve also purchased this paper before at Walmart. You can probably find it at any art supply store, as well.
Have fun!

I have a couple of reams of colored paper from the old days when I was the group newsletter editor for something.
LikeLiked by 1 person
All I have are the “neon” colors — which are fun, but I’d like a few pastels, too. Guess on my next trip into town I’ll have to look around. I did start making Halloween boxes this morning. It’s really fun!
LikeLike
i’m gonna keep this in mind! i could always use more boxes for organizing my various scraps. thank you for sharing this!
LikeLiked by 1 person
It was a lot of fun, and there are so many possibilities! One of our older granddaughters is coming to the art studio next month, and we’re going to make lots of boxes. They’re so cute!
LikeLiked by 1 person
just wondering- have you tried a masking pen yet with the watercolors? the results are really cool..i am just now really starting to use them for more than just practical things…so paper boxes would fit into that kind of fun. I first draw a design( sometimes paisley , sometimes just squiggles) and then go wet on wet with splashes of bright water colors. After it dries i rub off the mask and it looks pretty wild:)
LikeLiked by 1 person
Yes! I have a masking pen that I used last year when I started making Christmas cards. It really works well, much easier, I think, than brushing it on. You’re right… it would be a great way to make designs for boxes! I hadn’t thought of that. Thank you so much for the suggestion.
LikeLike
cool! yes, i am having great fun with it at the moment..and thank YOU- never thought of using it for making cards- most excellent!
LikeLiked by 1 person
The masking pen is really convenient. 🙂
LikeLiked by 1 person
Awesome!
LikeLiked by 1 person
These were really fun to make.
LikeLike
I learned to make these boxes as a way to use up the images on last year’s calendars. The paper is usualky glazed and stiffer than copy paper, and a dab of glue under the center flaps makes them pretty stable. If I were teaching children to make them, I’d call them promise boxes: put a message inside the box that will make your mom or dad happy, like “I promise to go to bed when you tell me this week, with no arguing.” “I promise to clean the hamster cage every Saturday.” Or “This coupon is good for one carwash….”
LikeLiked by 1 person
I love those ideas! Thank you for sharing. And I have a lot of calendar pages. 🙂
LikeLike