While yesterday’s video tutorial on drawing a cube was helpful for me, I came away from my practice — and blogging — with an “unfinished” feeling. There’s more to drawing cubes than shown in that simple video, and definitely more to it than using my little “go-to” box-drawing method.
What was missing was helpful information on foreshortening. Uh, what’s that? Well, you probably already know and understand foreshortening, but in case you’re new to art, here you go:
Foreshortening is an art technique that makes objects appear shorter or compressed to create the illusion of depth.
The Tate Gallery in the United Kingdom explains: The artist records, in varying degrees, the distortion that is seen by the eye when an object or figure is viewed at a distance or at an unusual angle – for example a body viewed from either the feet or the top of the head.
In other words, when we’re looking at a box, a block, or another cube-like structure, we’re not always looking at it straight on, and depending upon exactly how we view it, it’s going to look a lot different.
I knew I really needed to work on drawing foreshortened cubes, and I was still curious, too, about that “guide dot” I’d referenced in my sketchbook. So, I browsed around and came up with a copy of “You Can Draw in 30 Days” and spent some time re-learning the techniques Mark Kistler teaches.
Using his method was helpful. I filled a page in my sketchbook with the tops of various “foreshortened squares”, and then I opened my Paint program to show the process. This was my first attempt at using a digital program to draw geometric forms, and overall, I think I did all right — if you don’t mind geometric forms with big dots!
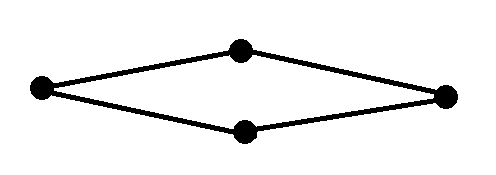
Step 1: Draw 2 dots on your paper, a short distance apart.

Step 2: Add 2 additional dots between these, slightly above and below.

Step 3: Connect the dots.
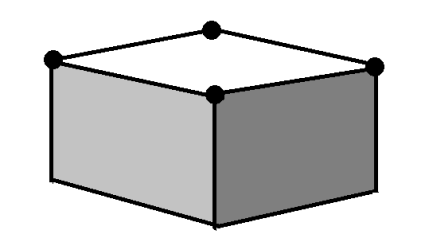
Step 4: Draw vertical lines down from the left, center, and right. Note that the center line will be a bit longer. After drawing these vertical lines, connect them at the bottom. This is the point at which it’s a bit tricky since the objective is to place the lines at the same angle as the upper lines.

Step 5: Finish the drawing off with shading. One face will be light, another will be a mid-tone, and another will be dark. Realistically we’d also add a cast shadow, but I skipped that for now.

Although this method is useful, even this doesn’t fully illustrate the principles involved in creating cubes when viewed at various angles. Those “center dots” you see can be in different places, depending upon how “distorted” our viewing angle is. If we’re viewing the cube from the side, those “dots” will look a lot different from the ones I’ve illustrated here.
So, it will still require a lot of careful observation and a lot of practice to create boxes and cubes that accurately depict the proper lines and angles.
We could actually continue with yet another “How to Draw Cubes” post and go into additional details on creating stacked cubes, hollow cubes, and cubes with lids, but for now, I’ve had enough. You’ve probably had enough, too!
I HOPE THESE POSTS ON DRAWING CUBES ARE HELPFUL — FOR YOU AND FOR ME!

I learned how to draw a see thru cube by diagonally intersecting two squares with 4 lines connecting.
LikeLiked by 1 person
Yep, that was the method I first learned, too.
LikeLiked by 1 person
Thinking of those dots really helps a lot–one can just move them around as needed.
LikeLiked by 1 person
Yes, the dots can be helpful. Cubes and boxes are still challenging for me, though 🙂
LikeLike
I don’t know how you, but I learned that in geometry class many many years ago. However, when we are talking about drawing, like drawing so that we could later draw something which implements cubes, this would be 2-point perspective which you use for any type of cubes or any other similar shapes, or buildings. However, when the angle is so wide, looks like 120 degrees, your vanishing points would be extremely far away and outside of the drawing paper. Certainly, this is extremely easy applying parallel lines. Well, all my students started progressing way faster when I prohibited them to watch any online tutorials.
Creating drawings is not a rocket science, but takes a bit of logical thinking and knowing some things about spatial geometry.
Very nice, and knowing what angles do what and what are parallel lines helps. This cube could look different, too, all depends on eye level and its placement. You could try rectangular cuboid which is a 1-point perspective literally.
LikeLiked by 1 person
It is all about perspectives in drawing foreshortened cubes, and for me, that means practice, practice, practice. 🙂 I’ll keep working on it.
LikeLike