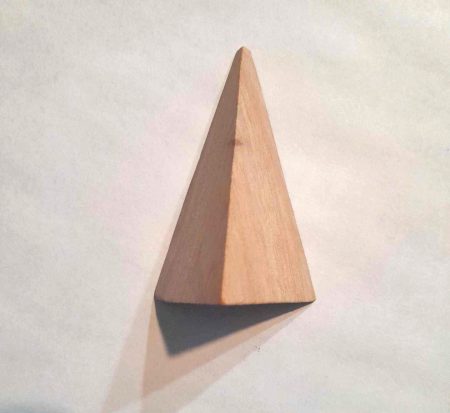
Today’s “block” for my 100-Day Project was this one, and had you asked me what it was I would have confidently called it a pyramid. Wrong. It is not really a pyramid, but a prism. Did you know this?
Obviously this was new to me, although I’d often wondered about pyramids and how many sides they had. Somehow I’d grown up thinking that pyramids had 3 sides, and then when I’d look at all those Egyptian pyramids and see four sides, I thought that must be some sort of aberration.
So this morning when I began drawing my geometric forms, I did a bit of browsing and came across this information:

Technically, yes, both of these geometric figures could be referred to as pyramids, but again, that’s not completely accurate. A true pyramid has a four-sided base with four triangular faces. A pyramid with a three-sided base and three triangular faces is actually a prism.
This was one thing among many things I learned from today’s drawing practice. Much of what I learned — such as the difference between a prism and a pyramid — is only indirectly related to the actual drawing process.
I wasn’t too happy with these geometric forms, for a number of reasons.

With the first attempt, I guessed at the angles, and I wasn’t too close. I know, of course, that we can “measure angles” with our pencil and then correctly draw them, so I did try using that technique for the other attempts.
I do still struggle with drawing straight lines, even though this was one of the first actual “drawing techniques” I learned. I did draw all the lines free hand until the very last — the one on the upper right — where I used a ruler to help me keep my lines straight. I think that was helpful.
One of the biggest problems I faced was the poor lighting in the studio. The lighting is set up more for my painting easel, not so much for drawing objects here at my desk. Usually if I’m drawing an object “from life”, I’ll go upstairs where there’s better lighting. Today I chose to stay here at the desk and see what I could do.
Obviously drawing shadows was a problem area for me. This is partly due to the lighting. I ended up with not one but two cast shadows for some of the orientations, and I was really lost on how to handle these different shadows. Unlike some shadows, they weren’t fuzzy and indistinct but actually well-delineated. I just did the best I could.
With the poor lighting, all faces of my prism were fairly dark. I tried to make some difference from one face to another, but at the same time I also tried to stay true to what I was seeing — and I really wasn’t seeing much difference from one face to another.
Once again, because of the poor lighting, I really couldn’t distinguish any “wood-grain” texture. Knowing it was there, I made somewhat of an attempt to create shading strokes that would suggest wood, but I wasn’t very successful at that.
It is an interesting exercise, however, to work with a geometric block like this and draw it from various angles. Doing this does make us look more closely at what we know to be a familiar shape and see how that shape can change depending upon the angle from which we’re viewing it.
Take-aways from today’s project are:
- Good lighting is essential for any drawing.
- It’s helpful to have a solid understanding of a form — such as knowing the difference between a prism and a pyramid.
- Rulers and other tools can be helpful, so why not use them when needed?
- We should strive for accuracy. Be sure the angles are right before we move on.
- Shadows are tricky, so I’ll need to give more attention there.
- Drawing the same form from different angles is excellent practice.
- Good graphite drawing involves not only shading, but creating textural elements.
Today’s practice wasn’t the greatest, but it’s only one day in a 100-day project. I’ll have lots of opportunities to practice with my little geometric blocks.

The shading and three-dimensionality look good, though! In the second group, I really like the one on the right.
LikeLiked by 1 person
Thanks. I really struggled with the shadows!
LikeLiked by 1 person
I also did not know that when its three-sided, it’s called prism. Learned something new today. 🙂
LikeLiked by 1 person
I’ve learned a lot since I started playing with these wooden blocks LOL. Drawing these different forms has been interesting, to say the least.
LikeLiked by 1 person