
Over the next few weeks I’ll be learning about — and practicing — lots of different brush strokes for oil painting. With practice, I hope I’ll be able to use many of these different techniques as I paint.
Brush strokes are important, make no mistake about that! As a beginning oil painter I didn’t give much thought to brush strokes. My only objective was to find some way — any way — to get my paint on the canvas. As I’ve gained knowledge and experience, though, I now understand how much can be done with good brush strokes.
Brush strokes are said to be one of the most challenging aspects of oil painting, and a bit of research has shown me that the term itself is used to describe different things to different artists.
Some artists and art instructors see brush strokes as basic painting techniques for blending colors:
- Gradient blending
- Wet into wet
- Scumbling
- Optical mixing
Other artists add additional brush stroke techniques such as:
- Hatching
- Glazing
- Underpainting
- Feathering
Today I’m going to share a little information about each of these techniques, although I see them not so much as brush stroke techniques but as overall painting techniques. Later, in future posts, I’ll share more specific techniques for individual types of brush strokes.
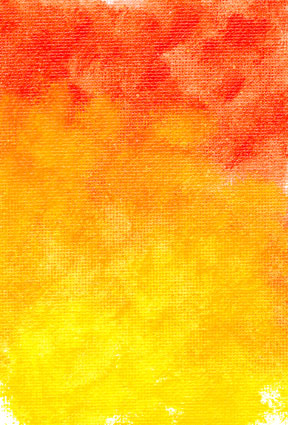
Gradient Blending
We’re all familiar with gradient blending, I think. It’s a process of creating smooth transitions between values or hues.
In this illustration, red and yellow have been blended to create a gradient transition. I’ve read that fan brushes are excellent tools for gradient blending. I’ve never been very good with fan brushes, but I’ve never tried using them in this way. This is definitely something I will practice in the future.

Gradient blending can be done, however, with any brush, and if you’re working on a large surface, you’ll definitely want to choose a fairly large brush.
Where would we use gradient blending? One area is in the sky, where we might want to transition from a light blue to a near white at the horizon. Gradient blending is also used in creating backgrounds for an oil painting subject.
The most important part of gradient blending, of course, is controlling the curve — that is, the center of the transition. With red and yellow, as in the illustration here, the curve should be orange with smooth blending from the red at one end to the yellow at the other.
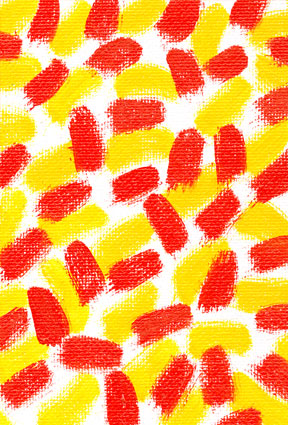
Wet Into Wet
Wet into wet applies not only to all prima painting — completing a painting in one session without allowing paint to dry — but also to a brush stroke blending method.
 As the term suggests, we blend colors in this way by applying first one and then another, allowing the hues to blend and mix right on the canvas.
“Start by painting a solid field of yellow, while the field is still wet, paint strokes of red on top. Use the same size brush spaced out to create a gradient effect. Have the stronger red at the top with more and overlapping paint stokes and stronger yellow at the bottom by using less brush stokes and spacing them further apart. The stroke directions should appear random and not regimented or lined up in a formal pattern for this technique. A round bristle brush was used for this example.”
From: Drawing and Painting Lessons
Again, though, we’re talking about blending and gradients more than the actual brush stroke methods used to apply the paint to the canvas.
Scumbling
Now we come to scumbling — definitely my preferred method of putting on the paints.
 Load the brush, push it against the canvas, and twist and turn a bit as you go. The result is an interesting mottled effect.
The idea here is not to create smooth transitions from one hue to another, but to have instead an eye-catching, almost textural effect.
Different brushes can be used for scumbling, but many artists recommend flat brushes.
One place where you’ll like want to use scumbling techniques are in creating clouds. Scumbling is also a good technique for creating ocean waves in seascapes.
Begin with the background color and then scumble in the second hue.
Optical Color Mixing
This is a technique I’ve never tried, and other than maybe doing it as a practice exercise, I doubt that I’ll make use of it too often.
 The idea behind optical color mixing is to create a blend by painting with two different hues, making random strokes first with one color and then with a second. The first color should be allowed to dry before the second color is added.
Although up close the painting looks like two separate colors, a viewer looking at the canvas from a distance will see the blended color — in this instance, orange.
This is the basis for pointillism — an art form using small dots of color which, from a distance, create a portrait, a landscape scene, or any other subject.
While pointillism is interesting, it’s far from my favorite style of art.
Note: The illustrations and much of the information above is from Drawing and Painting Lessons.
Hatching
Also referred to as cross-hatching, this method of applying paints is similar to the hatching we use in graphite drawing. Hatching is a process of applying parallel lines. In cross-hatching we repeat the process in a different direction. The intent is to create a sense of depth in the painting.
Glazing
With glazing we use transparent colors to build thin, translucent layers that blend with an underlying color. Glazing is often used to create smooth blends of colors.
Underpainting
I’ve been doing several different types of underpainting, and I’m interested in learning more about this technique. Generally underpainting is used to establish values in a painting. One of the best articles I’ve found comes from Artist Network. Here you’ll find not only helpful information, but a demonstration and practice exercises.
Feathering
I learned about feathering through an oil painting course at The Virtual Instructor. It’s a method used to create soft, diffused edges. It is sometimes called a “stitch” stroke because the two colors are stitched together with brush strokes to create the soft edge.
Here is my lopsided sphere from that lesson:

Understanding these basic brush techniques is a good starting point for me, and I hope this information may be helpful to others, as well.
From here, in future posts, I’ll move on to specific brush strokes — how to make them, where to use them, and other information for practicing and improving oil painting techniques. Be watching!
